Here's a few pictures of the tear down. i didn't get any of the re-assembly but its much the same as the assembly ;)
Okay so first thing to come off is the right side engine cover. What you see here is the automatic clutch on the right and the main drive gear to the left and behind. The clutch itself is the same as the semi automatic type without a few internal parts found on the CT110 (it was originally designed by jawa fyi :P). Flat plate type and centrifugal in operation. Its a robust piece and showed no signs of wear at all on this engine. You can buy uprated springs for them as well as performance clutch plates to raise the engagement rpm and give it the effect of more power.
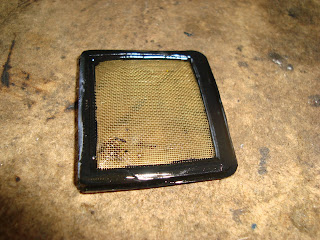
These engines have a very very basic oil filter if you could call it that. Just a small screen to filter out any large bits of flotsam. There was a tiny bit in there but nothing to worry about. gave that a clean and back in it goes..
Onto the left side. Ive removed the starter motor which sits in the casting up the top and drives a sprocket with a one way bearing in it just behind the big brass rotor. that was all up to scratch.
The large brass rotor is the flywheel and it also has a series of large magnets on its inner side and a small one on its outside. The small outside one is the trigger magnet that controls when to fire the spark plug and the inside ones generate power for the lights and battery charge circuit.
There are performance flywheels available that cut down the flywheel to a very small weight and size (called an inner rotor or outer rotor kit) so the engine can pick up revs faster which would be a good bonus on an application like this but in the interests of cost the stock setup is just fine.
Also visible on the right side is the (slight rusty) output shaft. unlike most motors of this kind this one has an extended shaft making it very tricky to swap over to another type. To put a bigger motor in you have use this shaft and machine the circlip grooves into it then install it in the new motor.
The small black box on the top right is the trigger. Also as described before it sends the signal to fire the spark plug to the cdi/coil. All of that was fine so onto the cylinder!
This is the top of the top of the engine looking into the barrel with the cylinder head removed. The cam chain is on the right side and the oil supply + drain are on the bottom (the rubber o rings) which were perished and needed replacement. This is a 50cc "short" barrel which is quite rare, as many are actually 70 or 88cc engines labeled as 50cc to get around import restrictions.
The piston itself. it looked in fairly good condition especially the rings (good enough to get it running again anyway) but it had cold seized on the top side a little bit. That is when the engine is run too hard from cold cause a seizure - so always warm up your engine thoroughly! Thankfully the bore wasn't marked so it was okay to use again after cleaning all the carbon off the piston and giving it a quick polish.
And the part where the power is made! the cylinder head. this one was in good condition. the valve seals and seats where really good and the head wasn't warped. so cleaning the valves and combustion area up saw this piece ready to re-use. You can see how tiny these valves are compared to my thumb. Big valve, 3 valve and 4 valve conversions are available.
Top of the cylinder head and camshaft + rockers. all the bearings looked great as well as the camshaft. The rocker setup isnt as ideal as the shim over bucket but works fine on a 50cc chinese made engine ;) it allows for very quick valve adjustment even though they need to be done more often as a result. Camshaft upgrades + valve spring upgrades are available.
This is the valve adjustment part of the cylinder head. To adjust the valves you just undo the lock nut and turn the center screw in while putting a feeler gauge in between the valve and screw. the engine MUST be on top dead center compression stroke otherwise it wont be right. I find .1mm and .15mm on the intake and exhaust respectively to be the best.
There is a great tutorial on youtube if you search for adjusting valves honda 50cc.
So there you have it! assembly was just the reverse of this, only things to note are that the gasket surfaces are very thoroughly cleaned with gasket remover to ensure a perfect sealing surface surface and all important bolts are torqued down to specs.
Some repsol 10w-40 motorbike oil and a new gasket kit and the job was done for less then $30.


No comments:
Post a Comment